Friday 7 June 2019

Antemortem

Antemortem


This piece portrays the culmination of six months of research and development into the meaning of life, death and the influence of belief systems.

Inspired by the Destiny theme in the last module, I proposed a continued exploration of ascension and life after death.  This led me to investigate 14 religions, belief systems and mythologies, to research their commonalities such as death rituals, what ‘life after death’ means and the use of talisman or totems.

I reflected on my own upbringing, religion and life experiences and questioned, what does life after death mean to me, how do I explain or portray it and what is my totem?

I acknowledged how people used local materials and artistic styles to craft their deities and totems so I cast glass to encapsulate my interpretation of them. This inspired me to focus on modern day totems.

It was important to me that I capture a sense of the place and period in which I have grown and have carried influential shapes and materials into my final piece, hence the concrete base and high rise towers.

I focused my design development on ‘family’, working through the shape and configuration of a family group and considered how I could merge my research of totems and life after death.  I had the realisation; my family group totem would capture the ongoing life story of each member and its existence thereafter would present a mystery and mystique for others to contemplate.
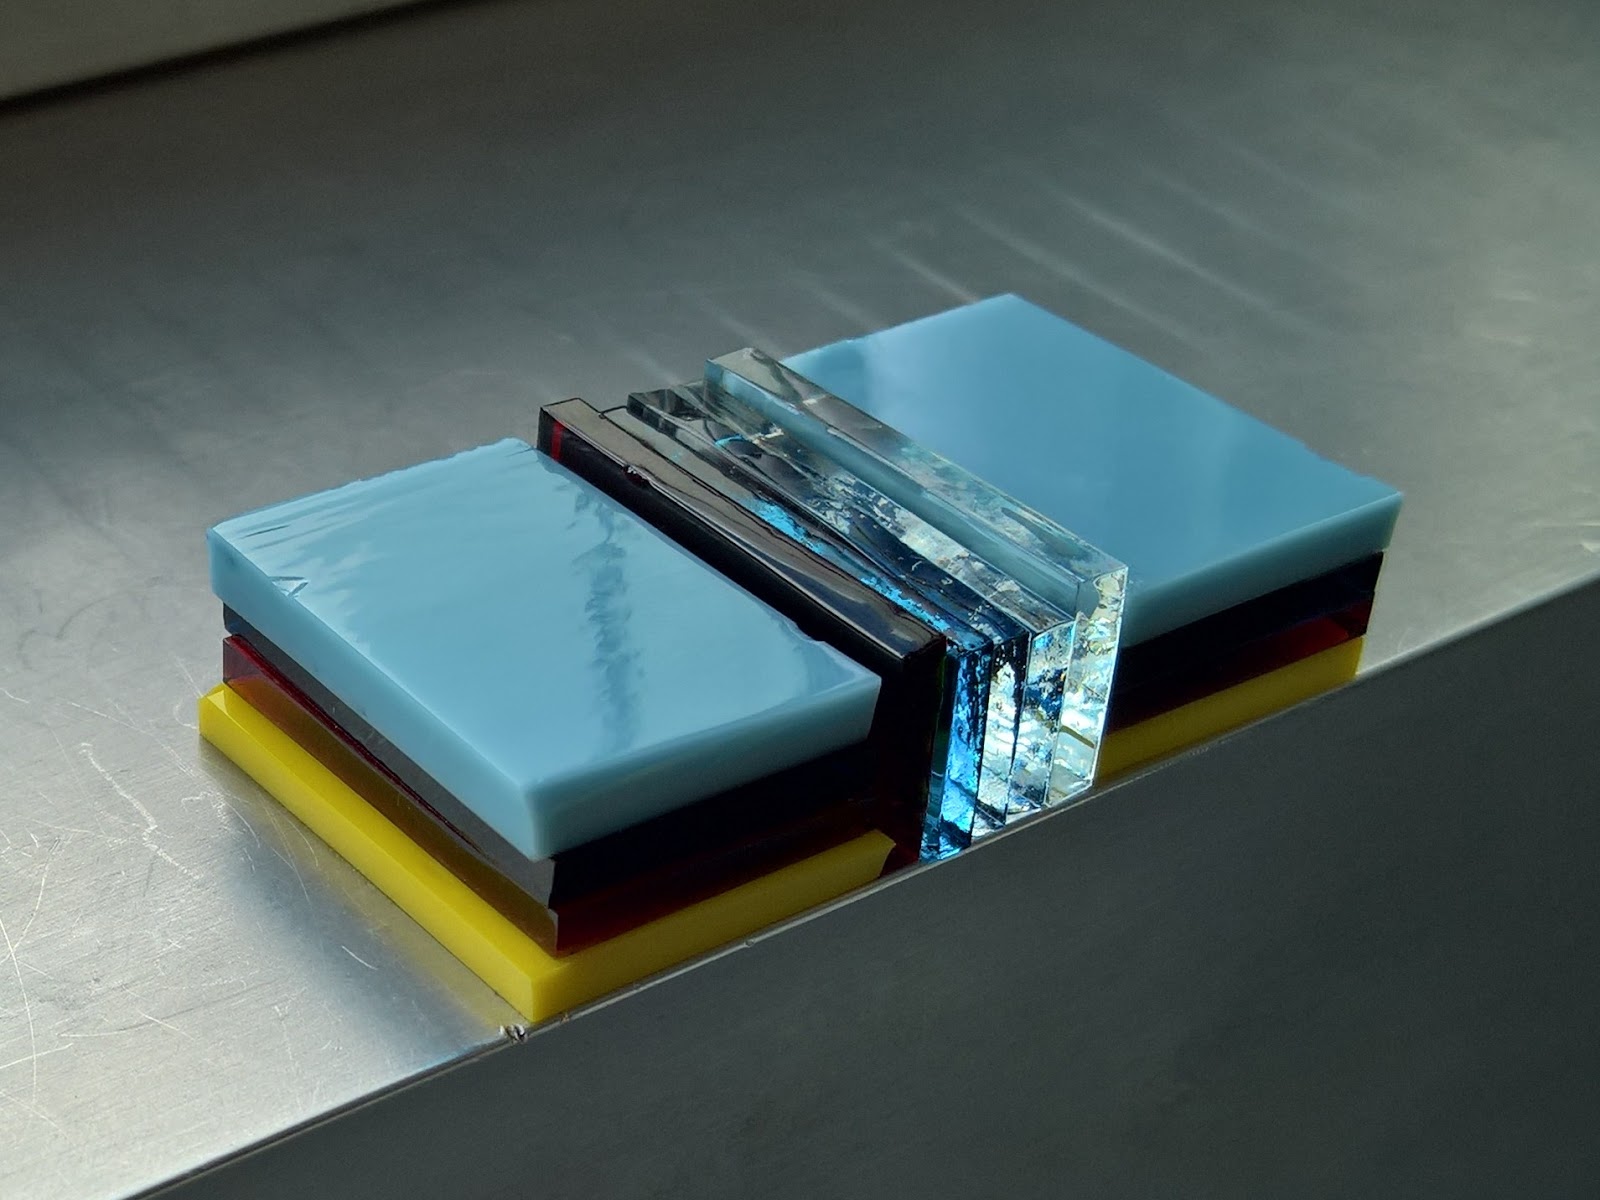
Antemortem consists of an illuminated fused glass totem tower for each of my family group.  Each captures the key stages of life and the events and activities that we experience and that transcend life stages, all retaining their identity while influencing who we become.  All colours have association with those stages, events and activities.


I would like to thank everyone involved in this project for their support, encouragement and insight, without whom I wouldn't have achieved this outcome.

I hope you have enjoyed this project as much as I have.  Now to get more moisturiser on my poor wee hands...


Let there be Life!

After months of work and several weeks of hard, very hard, cutting and coldworking I am now at the stage of getting ready for setup.

4 x totem towers - check
4 x base blocks - check
4 x set of ironmongery - check
4 x LEDs system - check
1 x plinth base - check.

All accounted for and safely packed up ready for transportation.

Location - Room 95, Stirling Campus, Forth Valley College, Drip Road, Stirling.
Space in the room has been: 
  • Cleared - check
  • Cleaned - check
  • Walls plastered filled, prepped and sanded - check
  • Walls painted - check
  • Wooden plinth cleaned, polyfilled, prepped and sanded - check
  • Wooden plinth painted - check


Now we are ready to install.

Install electrics inside the plinth - check
Fit ironmongery and wooden bases to concrete plinth - check
Test lighting - check


Have a night off...…

After finalising the floor location of the plinth I started to build up each of the totem towers, starting with the lowest to avoid any difficulty in movement later.  Take pride in your work and be professional so clean and polish each layer before placing them on the totem; it is time consuming but worth the effort.  I had to make sure the totems were being orientated properly so that the left side totem always reads from left to right and that is consistent for each side.  Build each tower up one at a time and fit the metal top caps.... Oh, an issue.

The top caps have a hex head nut fitted to the underside.  National standards had confirmed the nut dimensions across the flats and corners as being okay to fit inside a tube of 26mm however I hadn't accounted for the tube rifling reducing the inside dimension below 26mm.  This meant that the nut could not rotate down onto the central rod.  Time to get out the angle grinder and take off the corners.  Never be stuck for a solution.  Be calm, take a moment to stand back, consider options, ask if necessary and get into action.  Keep calm and get creative.

A final tidy up, wash down, making power cables safe (never forget health and safety - carry out an assessment).  All ready for the exhibition.


Never build your foundations on soft soil....

Well, remember I said to make a plan or plan to fail, and that it is important to track progress and look at what's coming next... Just as well, as I received a serious set back when I was informed by my blacksmith that he would not be able to make my metal bases nor plinth in the timescales planned for.


I now have to identify a solution that is achievable within the remaining time and, most importantly, is both strong and dense enough to provide a stable foundation for the weight of glass being displayed.

I considered a wooden option that still allowed me to realise a variable configurative base.  I mocked up a maquette to test this out but realised that it wasn't going to be solid enough to provide the stability required.

I then looked at my concrete option.  I had originally considered this way back in the project as one aspect of my design influence was the era in which I have lived and how the concrete high rise tower blocks have been a constant presence and are very indicative of my era, this time in human history.  I had been aware of other glass artists that have used concrete as part of their piece, such as Harry Morgan and Ben Young however my use was going to be different, it wasn't going to be integrated with the glass.  Also, I wanted to portray the strength and ruggedness of concrete, to get a sense of it.


A concrete base wouldn't give me the flexibility to reconfigure the arrangement of the totem towers hence I had discounted earlier, however in times of need, needs must. 

I am now venturing into wood and construction methods of working so carry out a health and safety risk assessment and adopt all of the safe working practices required - power tools, heavy handling, chemicals etc.

This was going to be an engineered piece.  It has to accommodate weight, supporting metal rods, access for nuts and washers, and a means of support and levelling  All of this had to be designed and executed precisely as concrete doesn't have a lot of flexibility afterwards.

Shuttering was made from plywood.  Holes were drilled for the rods, cable access and support feet bolts.  The retaining nuts for the feet had to be cast into the concrete and wire mesh had to be suspended to reinforce the concrete.  Wooden dowels had to be inserted  into the rod and cable holes and then supported vertically as these would need to align with the holes in the wooden base blocks and had to be accurate. 


Once the concrete was mixed and poured it had to be levelled.  I didn't want a smooth mix as I wanted it to look rugged and open textured as the next step was to finish the surface with clear resin.  First I have to leave the concrete for a few days to fully cure.


I used a two part resin for the finished surface.  I have used this before and like its clarity and strength.  You have to be patient when using on a large surface area with a bit of depth so pour in layers and let them set before applying the next.  This achieves better results.


Once everything has set I broke out the shuttering and started to cold work the edges of the resin and concrete.  This can be a slow process so it is important to have all the right tools.


Phew, completed on time!


5022, 155, (x4, x6, x60)

What is with the numbers?  What king of title for a blog is that?


Well, I have now cut 5022 pieces of glass and don't my poor fingers know it.  Those 5022 bits of glass have now been fused into 155 layer blocks and they all required cold working.

Each of these layers has four sides (x4)
Each of these sides requires six stages of cold working (x6)
Each of theses stages will take a minimum of sixty seconds (x60)

Therefore, 155 x 4 x 6 x 60 = 223,200 seconds > 62 hours of coldworking.

Never underestimate coldworking!!!!


All of that work pays off when you see the light of the LEDs shining through and bringing the layers to life.  All I have tp do now is getting ready for the exhibition. Phew......


Screech, clunk, click, Screech, clunk, click......

As Nick Lowe sang, "I love the sound of breaking glass"; well at least I thought I did.

My design has very specific measurements and many, did I say many, repeats.  Having given it some thought I needed a solution that would help speed up the process while adding quality control into the work (better built in that afterwards - Honda motors established that way back in the 1960's).  Time to build a jig.

This jig allows me to cut the 9omm, 30mm and 12mm sections of glass I need.


Well, it is one thing planning for quality control however it is another realising it.One thing I hadn't counted on was the quality of the glass.  System 96 has had some problematic years having been closed down as Spectrum, being bought over, relocating its plant to Mexico and then starting production and distribution.  It was always a buttery smooth glass with a silky cutting scoring sound and a soft breaking click; easy and precise and dependable.  Wow!  I was not expecting such a marked change.  The variation in finish and cutting was astonishing.  I had glass shearing off at impossible angles, shelling and overhangs of edges and that is only the cutting.  The texture, flatness and thickness of the glass was terrible.
The images above show the variation in thickness of the same number of layers of glass. 


If I was going for a low temperature fuse then it had to be hot enough to flat curvy glass but not with the result that the appearance softened - I couldn't achieve this so I had to suffer the rounding off and accept a load more cold working.

If I'm working to specific measurements (everything subject to 3mm glass thickness) then how do you cope with glass that varies in thickness from 2mm to 4.5mm all in one sheet and one colour?  I didn't realise this issue until my first load of fusing came out of the kiln.  This impacted on my cutting jig arrangement, slowed down production, compromised sizing, created loads more cold working and used my glass up faster than planned for.


Remember I had planned for contingency and had said, never underestimate cold working.  I hadn't but then I hadn't planned for such bad glass.  Oh dear, do I have some trying weeks ahead......

Opaques or Transparents - Sample

One of the big design questions was whether to use opaque or transparent glass, or both.  The one way to figure this out, while also taking into account a technical making step, is to create fused glass samples.  This is also important in identifying which make of glass to use in the final piece.

I selected some samples of glass and of colours that would reflect the developing design.  I cut them to scale and ordered them into both horizontal and vertical layers as this is a good representation of the intended piece.  Thankfully I had a reasonable supply of both opaque and transparent in Bullseye and System 96 makes of glass - the two prominent fusing glass manufacturers.

I fired them in the kiln to a schedule that was I was considering.


These images represent a few of the samples made and give an idea of the comparisons I was making:?
  • How does the light reflect off of the surfaces
  • How does the light transmit through the glass?
  • Is the colour density an issue?
  • How do the colours combine and merge as the viewing angle changes?
  • How defined are the shapes and layers?
  • How structurally sound has the fusing been?
  • Which glass has the best finish?
Lots of questions to be answered.

I also had to look at the process of cold working the glass.  This means any reshaping. cleaning and polishing of the glass you do after it has been fused.  You can see from the last two images above that the ends are irregular while the images above have very rounded edges.  I want to achieve a very regular block with defined edges and flat surfaces.  This will require sawing, grinding and polishing.  I conducted a test of this on the samples to understand the time it would take to achieve the desired finish, this was important in order to incorporate this into my plan.  One thing I have realised is to NEVER underestimate how long cold working glass can take.  The following image shows the process and end result comparison.


So what has this sampling established?

  1. I will use opaque glass for the main horizontal layers of life stages.
  2. I will use transparent glass for the horizontal activity and event layers
  3. I will use clear and colour transparent glass for the vertical transcending influences
  4. I will need to cut, grind and polish in coldworking.

I also established that I was behind schedule and had better get a move on if I was going to finish this project om time..... 


Antemortem

Antemortem This piece portrays the culmination of six months of research and development into the meaning of life, death and the inf...